
Guide
Open source tip: Rescuezilla, the versatile backup solution
by Martin Jud

The OWC Mercury Elite Pro Dual is a hard drive enclosure with four operating modes and space for two drives. This makes it versatile, while RAID 1 enables failsafe protection.
I bought an external hard drive enclosure with space for two 3.5-inch drives. I want to use it as a backup for data stored on my network-attached storage in future. The special thing about the OWC Mercury Elite Pro Dual is it has different operating modes. This allows me to create a storage network like network-attached storage (NAS) – with or without failsafe protection (RAID 1).
Since the case doesn’t have a network connection, it’s not network-attached storage – NAS – but directly attached storage – DAS. But this doesn’t prevent me from integrating the device into the network indirectly. For example, via the eSATA or USB port on my Synology NAS.
The Mercury Elite Pro Dual has space for two 3.5-inch hard drives with up to 16 terabytes of storage capacity – so a maximum of 32 terabytes. For this test, I’m using two 4-terabyte WD Red Plus HDDs I have lying around. I’ll get larger drives later, when I want to use them as a backup.
The case is made of aluminium. Not only does it look good, it also conducts heat better than if it were made of plastic. But that’s only secondary, since it’s actively cooled. The fan’s pleasantly quiet.
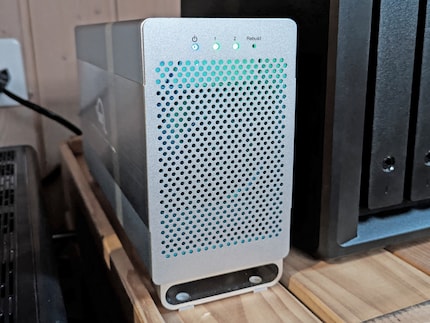
There are four LEDs on the front: a power LED, two hard drive LEDs and one labelled Rebuild. The latter flashes briefly when I change the operating mode. It flashes longer when restoring after replacing a (defective) hard drive in RAID 1 operating mode. This mirrors the data and saves it on both HDDs, meaning that no data’s lost if one HDD fails.
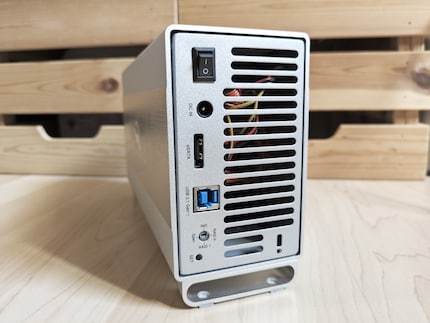
The back has a power switch and connections for power, eSATA and USB type B. It’s labelled USB 3.1 Gen 1, the old name for USB 3.2 Gen 1x1. In theory, this allows up to 5 gigabits per second – i.e. 625 megabytes. And the eSATA connection could theoretically make it up to 750 megabytes per second.
However, the manufacturer limits this in its specifications – OWC states that the Mercury Elite Pro Dual can reach up to 407 megabytes per second. Of course, this depends on the hard drives you use and what device you connect. There’s a somewhat short 60 cm USB cable included, along with an eSATA cable (1 metre).
There’s a Kensington Security Slot on the bottom right. And on the bottom left is the RAID selection (RAID 0, RAID 1, Span, IND) with a SET button. After changing the mode, the selection only takes effect if I press the SET button for three seconds. A good thing, because changing operating mode always results in the data previously stored on the hard drives being lost. Read on to find out what the different operating modes can do.
The OWC enclosure has a compact structure. It’s 7.1 centimetres wide, 13.5 centimetres high, 22.9 centimetres long and weighs 1.1 kilogrammes. Unlike a standard NAS, I have to open it to add hard drives.
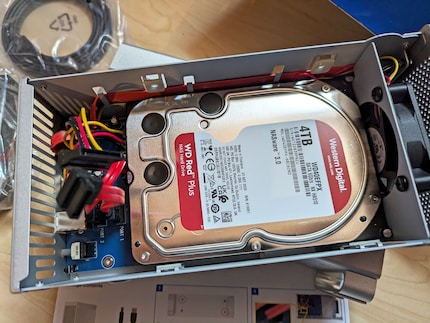
Before assembly, I was worried I was missing two screws. Only two of the four threads on the outer casing were filled. But, luckily, after opening it, I found a screw package in the casing that contained the remaining two – plus eight for the hard drives.
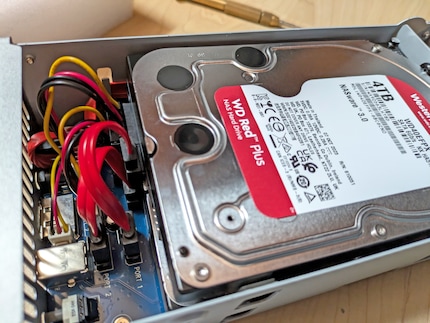
After inserting the hard drives, I make sure that I connect data port 2 to the lower one and port 1 to the upper one. This way, the order corresponds to the hard drive LEDs on the front. This’ll help if I want to replace one at some point.
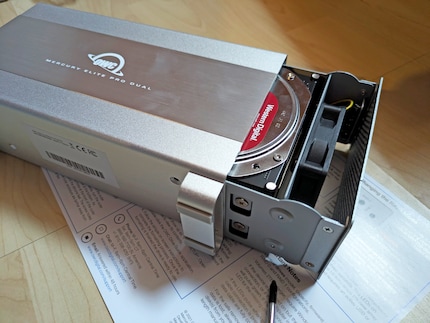
After the power cables are connected to the HDDs, I secure each with four screws. Then I push the inner casing back inside the outer casing and screw that in place as well.
Although OWC refers to the operating mode selection as RAID selection, only one operating mode results in a real RAID. RAID stands for redundant array of independent discs. It’s a combination of several physical hard discs – at least two – into a single logical drive with failsafe protection.
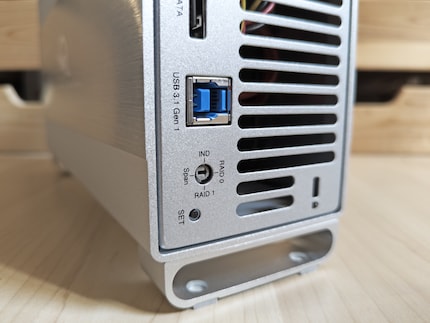
Here’s a relatively brief explanation of what each operating mode offers in theory. It’s essential to familiarise yourself with this before purchasing.
RAID 0 is simple hard drive striping that offers no redundancy/fail safety. Strictly speaking, it’s not a RAID system. All data is only written once. If a disc fails, not only is the data stored on it lost, but also the data of the entire RAID set. In return, you get the highest possible storage capacity – as long as you use HDDs of the same size. If you don’t, all discs in the group have the capacity of the smallest.
As the data is written in blocks across all available hard drives, RAID 0 offers excellent performance for read and write access. Parallel access to different HDDs increases data processing performance. What’s more, compared to other RAID levels, this is where the least overhead data is written – additional data that’s needed when restoring a hard drive, for example.
Disc mirroring offers redundancy. All data is written twice. If a disc fails, the data isn’t lost; it’s restored by the mirror drive after a replacement HDD is inserted. This doesn’t have to be reconstructed from parity information (as with RAID 5). It’s copied to the replacement drive at normal speed. The disadvantage with RAID 1 is that you only get half of the total storage space used.
As with RAID 0, you should make sure you use drives of the same size. If you don’t, all the discs will have the same capacity as the smallest one. The writing speed is the same as running a single disc. The reading speed is faster because there can be parallel access to different discs.
Spanning doesn’t offer any redundancy. As with RAID 0 (and JBOD), it’s not a RAID system in the true sense of the word. All data is only written once. Unlike RAID 0, the data isn’t written in blocks across all available drives; it’s linear. If a disc fails, contiguous writing means only what was written on the failed disc is lost, not the entire RAID set.
With Span, you can use hard drives of different sizes without losing capacity. However, you have to go without the accelerated access of RAID 0.
IND stands for independently, although the more common name for this mode is JBOD (just a bunch of discs), where the various hard drives run independently of one another. As long as they’re not combined into a common volume by software, each disc is given its own drive letter. This distinguishes the operating mode from other available ones.
As each HDD is independent, you can mix different sizes without losing capacity. If a disc fails, only the data written to it is lost, not all of it as with RAID 0. However, JBOD doesn’t offer any accelerated access.
After installing and selecting the operating mode, I have to initialise and format the drive. Only then can I use my new DAS. I do this with the Windows Disc Management tool. After I’ve connected the external dual hard drive via USB and turned on the power, the application automatically asks me whether I want to initialise it. Then I format it and initially select the exFAT file system.
This has the advantage that I can use the drive with any operating system, which isn’t possible with NTFS, for example. After the tests, however, I’ll go with the ext4 file system. Partly because it’s better – apart from in terms of compatibility – and partly because I’ll only use the hard drive enclosure as a backup solution under Ubuntu (Windows doesn’t support ext4).
If you’re looking for a good solution for formatting, partitioning, etc., I can recommend GParted. Or Rescuezilla, which includes GParted.
To test how fast my new almost NAS is, I connected it to a current PC using a USB cable. I tried all the operating modes and wrote a film file of around 50 gigabytes from the SSD to the DAS and copied it back down again several times. According to the manufacturer, the Western Digital hard drives I use achieve a maximum transmission rate of up to 180 megabytes per second (without RAID acceleration).
Under RAID 0 – which is supposed to offer accelerated read and write access – I achieve an average of 334 megabytes per second when writing. When reading, it gets up to 346 megabytes per second. This works as expected considering the hard drive specifications.
However, under RAID 1, where there should theoretically be increased read access, I get an average of 174 megabytes per second when reading and writing. Although I’m a bit disappointed, I can live with that. When testing Span and JBOD – neither of which offers increased read or write access – I also get between 170 and 180 megabytes per second.
I don’t have an eSATA port on my computer, so I can’t test the connection. But as the enclosure doesn’t fully use the capabilities of USB, eSATA’s theoretically higher data processing performance won’t be of any benefit. As a reminder, OWC specifies a maximum speed of 407 megabytes per second for the dual hard drive enclosure, which covers both USB 3.2 Gen 1x1 with up to 625 megabytes and eSATA with up to 750 megabytes per second.
The OWC Mercury Elite Pro Dual is a well-made, robust hard drive enclosure. The fact I can’t add or remove hard drives without using a screwdriver doesn’t bother me, especially as it’s not a lot of work. In terms of functionality, the OWC Mercury Elite Pro Dual offers exactly what it promises on paper. With one exception: RAID 1 operating mode doesn’t achieve the theoretically accelerated reading speed. It’s a flaw that I can live with when I factor in the current price of around 80 francs/euros.
If you need your own cloud as well as storage, it wouldn’t be my first choice. If you use NAS instead of a DAS, you can get various empty NAS cases with space for two hard drives for less than twice the price. If you just want a backup, the Mercury Elite Pro Dual is a good option.
Pro
Contra
I find my muse in everything. When I don’t, I draw inspiration from daydreaming. After all, if you dream, you don’t sleep through life.