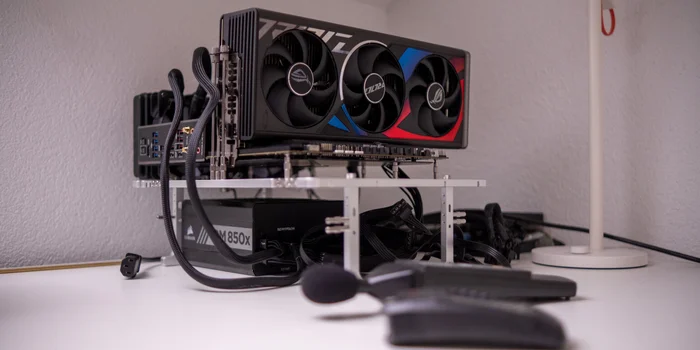

With this well thought-out benchtable, I will test PC components in the future .

The BC1 V2 from Streacom is the ultimate test station. It is now in use at my place.
Testing PC components is time-consuming. I have to put together a working system, run umpteen benchmarks, create diagrams and write an article. I've been doing this for over three years. To make it easy for me, at least for the first step, I treated myself to the BC1 V2 Benchtable.
This thing is one of the most thoughtful pieces of anodised aluminium I've ever held in my hands. I think what Streacom has put together with the second version of their test platform is simply ingenious.

A small work of art
I have yet to get the BC1 V2 up and running. It comes unassembled in a plain brown cardboard box. I open it like the cover of a book. The packaging is magnetic, so it's easy to close and use again.
Once opened, there is only the testbench in the box. There are no physical instructions. I access the manual via QR code. No paperwork is a big plus for me.

Source: Kevin Hofer
The testbench itself looks like a work of art when unassembled. I would hang the thing on my wall. With the handle, it reminds me of a chopping board - an aesthetic one, of course. The fastening material is lovingly integrated into various recesses. Everything has been thought out down to the smallest detail.

Source: Kevin Hofer
The Bench is just 370×260×8 millimetres small. Perfect for transporting or stowing away. At 1.75 kilograms, it is no lightweight, but the heaviness underlines the quality of the materials used. The frame and legs are made of CNC-machined aluminium, the screws of steel.
Easy assembly
All the screws I need are tightened on the BC1 V2. If I want to travel with the part, I have everything with me and can't lose anything. This is probably especially relevant for overclockers who are on the road a lot. I attach the legs to the plate with four screws. Before that, I have to remove them from the plate. Once erect, the bench is bombproof. I sit on it with a live weight of 74 kilos. It holds, even though a maximum of 25 kilos is recommended.

Source: Kevin Hofer
I attach the power supply unit to one of the legs with finger screws. With many PC cases, the threads are not turned cleanly. Not so with the BC1 V2. All the screw holes I use are flawless. It's really fun to screw in the screws. I connect an ATX-standard power supply unit, but I could also attach SFX-standard ones.
The spacers for the mainboard are attached to the legs. There are two types to choose from. The board can be plugged onto one, or screwed onto the other. If I decide to screw, I should not use all nine spacers necessary for an ATX mainboard. I still need two of them to mount the graphics card. Since I'm not taking the testbench with all its components on a world tour, I decide to use the clip-on spacers. Even so, the mainboard holds well. In addition to ATX mainboards, I can also mount those with Mini-ITX and M-ATX form factors.

Source: Kevin Hofer
To mount the graphics card, I first have to attach two support screws. These are also elegantly integrated into the plate of the Benchtable. Thanks to the support screws, the graphics card sits firmly on the mainboard.
If I want, I can attach up to two 3.5-inch drives. Since I rely exclusively on M.2 SSDs for the testbench, this is not necessary. What I do need to attach, however, is the radiator of the water cooling system, including the fan. Four brackets are mounted on the benchtable for this purpose. I need two of them to attach it. This is also quite easy if I don't mount the mainboard first. Otherwise it is in my way. Unfortunately, this is only mentioned at the end of the corresponding step in the instructions. That is my only small criticism.

Source: Kevin Hofer
With this, the test bench is ready. Now I just have to wire everything up. Thanks to various holes in the plate, I could run the cables. But I usually test a product and stow all the components away again when I'm done. I therefore don't need the guides.
If you want to show off your components, you can also set up the Benchtable vertically. However, depending on the size and weight of the graphics card, this is not recommended. With the RTX 4090 currently perched on the Bench, I wouldn't want to risk it.

Source: Kevin Hofer
The perfect testbench
The BC1 V2 is my third benchtable. Before Corona, I worked with a huge, clunky testbench in the office. Then I was banished to the home office and made "The Poor Man's Testbench" because of space constraints. After two and a half years with the makeshift thing, I will henceforth rely on Streacom's ingenious test system.
The workmanship and the materials used are excellent. Everything has been thought through down to the smallest detail. Screws, spacers and co. have their place on the Benchtable and I therefore don't lose them. When dismantled, it is smaller than DIN A3 format and only 8 millimetres thick. When assembled, it is no bigger than two shoe boxes. It is perfect for travelling and takes up little space when not in use.
I have found the ultimate testbench for me. If you test components yourself or like to show them off, I can highly recommend it - even if it is more expensive than many cases at over 140 Swiss Francs.
Titelbild: Kevin Hofer

From big data to big brother, Cyborgs to Sci-Fi. All aspects of technology and society fascinate me.


